

The Dictionary of Architecture and Construction defines "half-timbered" this way: "Descriptive of buildings of the 16th and 17th cent. which were built with strong timber foundations, supports, knees, and studs, and whose walls were filled in with plaster or masonry materials such as brick."

the Plan!

 |
| A neater version with measurements |
I cut the base from thick card and a floor from walnut veneer (available form Antics)
 and scored planking with a sculpting tool. I cut the walls for the ground floor from foam card
I cut thin strips from card, I found the kind of card that Christmas cards or some fliers are made from is best. I cut it rather haphazardly as I wish to represent block stone rather than brick , approximately 2mm wide with some wider more uniform strips to make the foundation stones at the foot of the wall
I found pasting the foam board with a coat of PVA and then placing the "blocks" was the best (least fiddly)method. I started using fine pointy tweezers(forceps) but soon move on to "spiking" the blocks on a sharp knife tip as the tweezers soon became very sticky. At one point I used a short piece of wood with some semi-dry glue on the tip and this worked ok too.
I gave the completed block work a coating of diluted PVA to seal the deal. At this stage I am aware that the windows and doors are not quite square or even, make a mental note, adjust at next stage when the walls are good and hard
 I stuck the floor to the base and then the walls which I bound with some
woolen twine, I pulled it in tight and used short lengths of walnut beam
to tension twist the wool. A bit of product placement helped to press the floor down. The walnut veneer is great to work with in many ways but sheets have a tendency to curl when a lot of adhesive is employed.
I stuck the floor to the base and then the walls which I bound with some
woolen twine, I pulled it in tight and used short lengths of walnut beam
to tension twist the wool. A bit of product placement helped to press the floor down. The walnut veneer is great to work with in many ways but sheets have a tendency to curl when a lot of adhesive is employed.

 I added a wooden frame to the tops of the walls, extending out in front of the building. My plan to make the whole thing modular requires a good strong interface between storeys and I am thinking the the wood can be filed with precison. I layer on some dark grey and base coat the interior

 By bevelling the cut outs, I hope to use them to create the lower aspect of the bay windows.
 Like this

Undercoat the walls
 inside and out
 Adding the wood frames and sills. I cut the sills rather over sized and found by making small cuts in the walls could insert them slightly into the wall. The frames were a bit fiddly to fit but are simple uprights between the sills. Remember my dads motto "measure twice, cut once"
Painted the outer wall with my variant on "medieval whitewash" I used an old and splayed brush and slopped it on as if it had been applied with mops!
 Finishing touches to the stonework. I use a lot of GW washes as I think they are excellent quality. I went for grey blocks but I am aware that stone has many variations in its colour and tone so I used in varying quantities Seraphim Sepia, Agrax and Fleshtone to add some variety. The wood has been stained with Fleshtone and the glazier has visited, more on him later

 First floor with the woodwork in and final coat of paint, external timbers have been applied. There are so many different variations on how these timber frames appear that I would suggest pick one you like. I like simple.
I used heavy framing around the top of the walls and across the bay window and dedicated a lot of effort and time in filing this to a nice flat level across the piece.

More staining! Agrax this time! The veneer is quite dark to begin with and changes dramtically with different inks. It also takes quite a few coats.


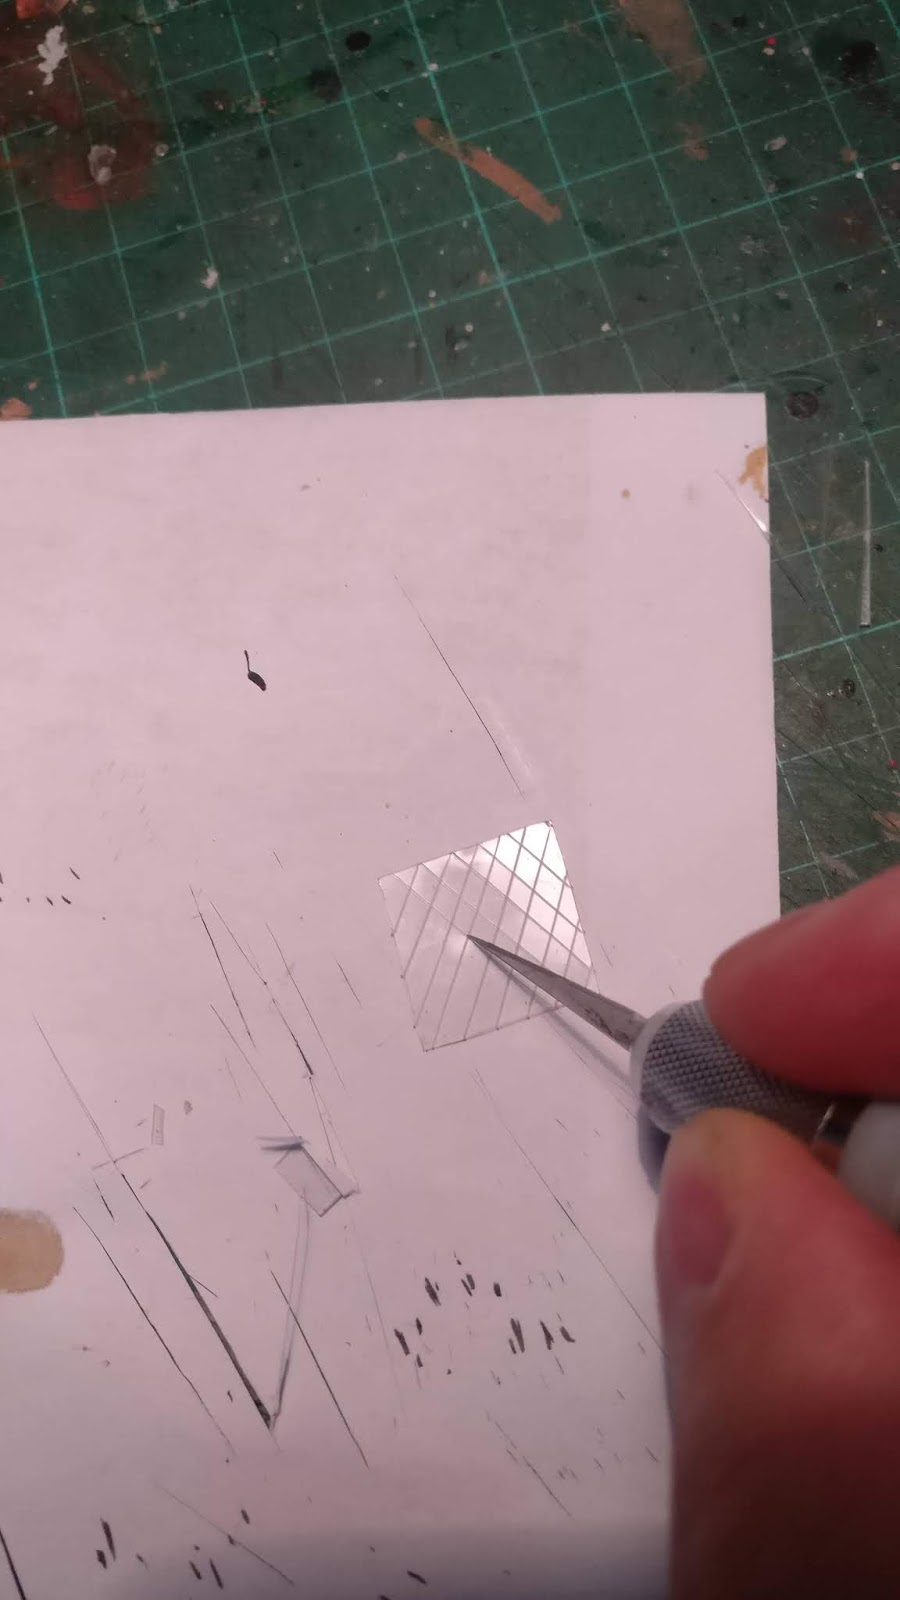
The leaded windows are cut from packaging , there is quite a variation in clear flat plastic packaging, some companies use a dimpled variant , some slightly fogged. Needless to say I have a good supply , thank you figure manufacturers of the world and I picked the flattest and smoothest. With a good sharp blade and steady pressure score the pattern on the plastic. Keep the window over a white surface so you can see the scoring and then with a very fine brush use black paint to define them. I tried different methods before settling on this one.
 I added the glass cutting it slightly over sized.


 I used strips of walnut veneer to create a frame for the roof. I measured it carefully for a snug fit on the first floor module. I fixed a small board on the rea of the roof, proud of the frame to fit inside the first floor module.

 The Little gable proved a challenge throughout the project
 The chimney was "bricked" in a similar way to the ground floor walls and "capped" with small strips of walnut veneer carved to resemble stone.
 Coated with PVA and allowed to dry


I used Foundrys Terracotta triad to paint the roof being sure to use a few very pale almost grey tiles and washed copiously with brown inks.

 The modular concept works well. Its easy to take apart for the placement of figures.
 A few decorative touches! I decided not to do much in the way of internal structures as I want to keep the rooms "clutter free"
 I took pics of me and my fam posing , printed them very small and then painted over the back ground detail. Frames are cut from card and painted gold.
 Pleased with my efforts , I used my new found skills to knock up another cottage
 The hinges on the shutters are cut from my old favourite.....whisky lead foil
 |
| the Floor Plan |
 and scored planking with a sculpting tool. I cut the walls for the ground floor from foam card

 Bricking it
I cut thin strips from card, I found the kind of card that Christmas cards or some fliers are made from is best. I cut it rather haphazardly as I wish to represent block stone rather than brick , approximately 2mm wide with some wider more uniform strips to make the foundation stones at the foot of the wall

I found pasting the foam board with a coat of PVA and then placing the "blocks" was the best (least fiddly)method. I started using fine pointy tweezers(forceps) but soon move on to "spiking" the blocks on a sharp knife tip as the tweezers soon became very sticky. At one point I used a short piece of wood with some semi-dry glue on the tip and this worked ok too.
 |
| a completed wall |


 I added a wooden frame to the tops of the walls, extending out in front of the building. My plan to make the whole thing modular requires a good strong interface between storeys and I am thinking the the wood can be filed with precison. I layer on some dark grey and base coat the interior
I cut out the pieces for the first floor.I hit on an idea on how to build the gable windows...


Undercoat the walls


Painted the outer wall with my variant on "medieval whitewash" I used an old and splayed brush and slopped it on as if it had been applied with mops!


I used heavy framing around the top of the walls and across the bay window and dedicated a lot of effort and time in filing this to a nice flat level across the piece.

More staining! Agrax this time! The veneer is quite dark to begin with and changes dramtically with different inks. It also takes quite a few coats.

The leaded windows are cut from packaging , there is quite a variation in clear flat plastic packaging, some companies use a dimpled variant , some slightly fogged. Needless to say I have a good supply , thank you figure manufacturers of the world and I picked the flattest and smoothest. With a good sharp blade and steady pressure score the pattern on the plastic. Keep the window over a white surface so you can see the scoring and then with a very fine brush use black paint to define them. I tried different methods before settling on this one.


I cut the roof from some card and the gables from foam board. I used some off cuts of foam board to reinforce the apex and created a cats cradle of rubber bands to provide pressure until the glue dried.


 The shingles were cut from thin card using "pinking shears" and overlapping the strips. This kind of rhomboid shingle was fairly commonly used throughout Europe during the medieval period . I found I had to compress the layers to ensure they bonded.


I used Foundrys Terracotta triad to paint the roof being sure to use a few very pale almost grey tiles and washed copiously with brown inks.


